I Wannabe...
Monday, March 25, 2013
Portable Storage for Hairstyling Supplies
I've previously shared Meg's hairbow storage. This is how we store all the rest of Meg's hairstyling supplies. Styling Meg's hair happens on my bed, her bed, on the family room couch, sometimes even at the kitchen table when we're in a rush, so portability is important for us. I like having everything visible, so open containers are a must for the way I work, especially when I'm juggling multiple strands of hair for a complicated style with a moving target.
These felt baskets are from Target's Dollar Spot, purchased at 70% off after a holiday. These are likely sold out, but they often have similar containers, after Easter will likely be a great time to find some. I've separated the accessories in a way that best suits my needs: jaw clips, snap clips, and scrunchies/ponytail baubles. You might prefer to do it by color or size.
This clear container is a drawer organizer from Dollar Tree in the kitchen area. I believe I got 3 for $1. It holds hair elastics.
This clear container actually came with a set of tiny elastics from Wal-Mart. It now holds small easily-misplaced clips.
At the top is another clear drawer organizer from Dollar Tree. It holds (l-r) spray bottle of water, glitter spray and pink spray purchased on clearance after Halloween for special days, hairspray (used very sparingly for portrait days and such), and detangler. It also holds a couple sizes of Topsy Tails, a rat tail comb, and a wide-tooth comb.
The blue and white chevron basket is from Ross, a steal at just $6. It's very sturdy and so pretty.
posted
7:00 AM
1 responses
Sunday, March 24, 2013
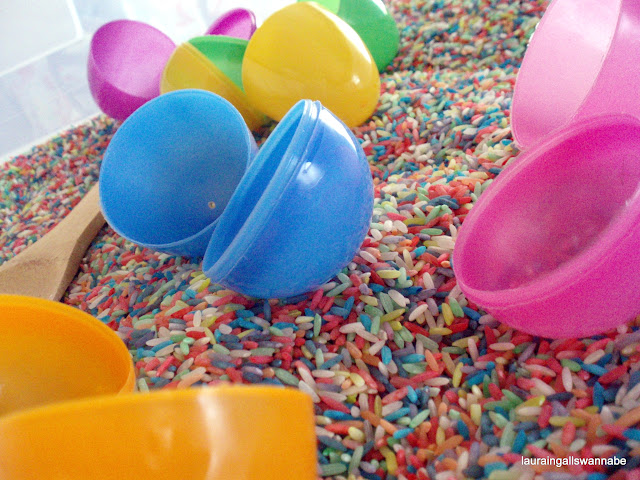
March Sensory Tub - Springtime Rainbow Rice and Easter Eggs
Like many others in blogland, our March sensory tub features rainbow rice and plastic Easter eggs.
I've been wanting to make rainbow rice for ages, and I'm annoyed I waited so long. It was simple, quick, and the kids are crazy about it. I combined 1 cup of rice, 1 teaspoon of rubbing alcohol, and a few drops of food coloring in a mixing bowl and stirred until evenly colored. Dumped it on a cookie sheet, wiped down the bowl and spoon, and moved on to the next color. I let it dry overnight, but a few hours would have likely done the trick.
The colors looked lovely side by side in a clear tub.
And even more beautiful once they were all mixed together.
I started by offering it as shown, but Meg and her friend have quickly added metal pots and pans from her play kitchen, plastic bowls, a potato masher, and funnels scavenged from the kitchen drawers. Since the rice is in a wide, shallow tub, there's plenty of room for the two girls to play together happily. It's been out all month, and they still play with it for a good half hour to an hour each day.
posted
7:00 AM
0
responses
Saturday, March 23, 2013
Springtime and Easter Activity Shelves
Because of our Disneyland trip at the beginning of March, we pretty much skipped any St. Patrick's Day fun this year and went straight to Easter and the onset of spring.
This month, along with the usual toys, our kitchen activity shelves are stocked with:
- stuffed bunnies, ducks, and lambs
- generic springtime books (we really haven't collected many books in this category, so I don't have any recommendations for you)
- uppercase/lowercase matching eggs
- plastic eggs shaped like bugs, nets, and a pail - We scatter the eggs around the kitchen floor and scoop them with the nets to return them to the pail.
- sound shaker eggs - I filled two eggs each with pennies, sand, beans, and other noisy filler and hot glued them closed. The kids shake them to match the sounds.
posted
2:57 PM
0
responses
Sunday, March 10, 2013
Homemade Personalized Disney Autograph Album
I wasn't crazy about the price tag or styles of Disney park autograph albums for our Disneyland trip, so I made one for Meg in advance. I had a surprisingly difficult time locating the perfect notebook to use as a base at first. I finally went with this one from Amazon. I wanted thick blank pages, spiral bound, 4x6ish, hard cover, no perforated pages, and an affordable price. This one hit all those marks except for the perforated pages, but they're nice and tight, so there's no real concern about them falling out, and it was a non-issue.
I mod podged some scrapbook paper to the front and some stickers spelling out "Disney" and my kids' nicknames. I covered it all with 3 heavy coats of mod podge to it'd stick well. Then I tied a variety of short ribbon pieces onto the spirals to fancy it up a bit more.
I purchased fat clickable Sharpies, so the characters in suits could easily operate them. It worked really well. Here it is in action:
posted
7:00 AM
0
responses
Saturday, March 9, 2013
Disney-Inspired Monsters, Inc. Mike Wazowski Shirt
I needed one more Disney-themed shirt for James to wear on our Disneyland vacation, but I wasn't liking anything I saw in stores. The only thing that struck my fancy was a Monster's Inc. onesie from Target, but it only came in infant sizes. So I decided to make my own. Finding a lime green top in his size proved difficult, but I finally spotted one in Wal-Mart. It had some screen-printed saying on it, but it was easily covered up by the applique. And it was only $3.50!
I used felt for the applique, because that was the only fabric I had on hand in the right colors. I went to our recycling shelves and grabbed some plastic lids in a few sizes to use as circle templates. I made two of the white one so it'd be thick enough that none of the screen printing underneath would show through. Then just a smaller blue and an even smaller black circle all bound together with fusible interfacing and stitched to the shirt with coordinating thread. I didn't have to tightly zigzag the edges, because the felt won't fray, so I did a simple straight stitch the disappeared nicely.
And here it is in action:
We got so many compliments on his shirt in the park. This is definitely one he'll be wearing over and over again. I was worried the 4 layers of felt would be cumbersome, but that didn't prove to be the case at all.
posted
7:00 AM
0
responses
Friday, March 8, 2013
Disney-Inspired Mickey Head Shirts
Another easy Disney project I undertook in preparation for our trip was to make simple coordinating shirts for the kids. I stole some plain black shirts from their closets, cut Mickey heads from fabric in my stash, and appliqued them on. Couldn't get any simpler, and they looked darling. I wanted to make sure that any clothing I made for the trip was something I'd put the kids in later. No need for one-time-use clothing. By using the simple shape and fashionable fabrics, I have no stylistic misgivings about my kids wearing these shirts again and again.
Here they are in action:
posted
7:00 AM
0
responses
Thursday, March 7, 2013
Disney-Inspired Ribbon Sculpture Hair Clips - Jessie, Belle, and Mickey
We recently got back from a trip to Disneyland, so this blog is about to get Disney-heavy for a while. I went a little crazy crafting clothes and accessories for the kids, which just served to build our excitement and anticipation.
I don't have a tutorial or in-progress photos for this first one. I just Google image searched pictures of ribbon sculpture bows for the characters I wanted to use as inspiration and winged it from there. I matched the clips to the three outfits I'd planned for my daughter to wear on our trip. They really were so very simple and didn't take more than 10 minutes apiece to construct from grosgrain ribbon, alligator clips, tiny rhinestones, and hot glue.
Here they are in action:
If you have any specific questions about the process, I'd be glad to try to help!
I don't have a tutorial or in-progress photos for this first one. I just Google image searched pictures of ribbon sculpture bows for the characters I wanted to use as inspiration and winged it from there. I matched the clips to the three outfits I'd planned for my daughter to wear on our trip. They really were so very simple and didn't take more than 10 minutes apiece to construct from grosgrain ribbon, alligator clips, tiny rhinestones, and hot glue.
Here they are in action:
Unfortunately, I didn't get any great photos of this one. |
If you have any specific questions about the process, I'd be glad to try to help!
posted
3:34 PM
1 responses
Subscribe to:
Posts (Atom)