Showing posts with label Disney. Show all posts

Wednesday, February 12, 2014

Disney Surprise Fun Bags for Extra Park Magic

I don't have any great pictures for this post, unfortunately. I have snoopy eyes over my shoulder, and I want the bags' contents to be a bit of a surprise for the little ones.


I loved this idea I found on Pinterest, making fun surprise bags for the kids to open at specific times during the trip. For mine, I used brown paper lunch sacks, a Sharpie, free Disney stickers from the Disney Movie Club welcome package, and washi tape to close them. Our bags contain:

  • Open when there's a rumbly in your tumbly: fancy lollipops - purchased on clearance in hopes of staving off requests for the pricy park ones.
  • Open in a looooong line: 1)squishy sensory ball and plastic Slinky, 2)Rubix cube and plastic Slinky. - all from Dollar Tree.
  • Open before Fantasmic and the parade: glow swords, glow sticks, light-up bracelets - Dollar Tree and Target Dollar Spot.
  • Open when people-watching: mini bottles of bubbles - Dollar Tree.
  • Open when you see a penny machine or a wishing well: homemade penny tubes.
They're nothing beautiful to behold, but I think the kids will get a kick out of opening them. They'll be stashed in our park snack bag until they're needed.


Photobucket

Tuesday, February 11, 2014

Going to Disney - Road Trip Fun Bags

We're more fortunate than many in that our trip to Disneyland is only a 6 hour drive, and Nana's house is conveniently right on the way, so we can stop and eat and let the kids stretch their legs. I'm also crazy lucky to have won the roadtripping kids lottery. My kids love the car. Even so, I thought it would make the trip extra exciting if I packed up a few new treasures to bring along for the kids.

Target had their Skip Hop backpacks on sale for 70% off last week. Even though my daughter already has the fox and my son has the hippo, I couldn't resist these matching frog backpacks for just $6 apiece.

Two year old's road trip backpack.


Jamie's backpack contains:
Disney My First Look and Find book - purchased used on Amazon
Disney coloring book - Dollar Tree
Minnie Mouse crayons - I split up the three pack from Dollar Tree between the kids
kaleidoscope - Michael's dollar bin
dinosaur figures - Dollar Tree
Disney board books - from the Target Dollar Spot a few years ago
Mickey Mouse flashlight - Dollar Tree

Four year old's road trip backpack.


Meg's backpack contains:
Brave Look and Find book - purchased used on Amazon
Disney coloring book - Dollar Tree
Minnie Mouse crayons
kaleidoscope - Michael's dollar bin
dry erase flashcards and crayons - purchased on clearance from Michaels (cards) and Target (crayons)
sticky hand - Target Dollar Spot
Minnie Mouse flashlight - Dollar Tree

I'll also add a blank notebook for each kid and Meg's CD player and headphones. Blankies, sippies, and snacks are a given. I found a Captain Hook plush and a Monster's Inc. Boo plush for a steal during Target's spring toy clearance, and I might give them to the kids for the ride, or I might save them for the hotel room.


Photobucket

Thursday, February 6, 2014

Homemade Personalized Disney Autograph Album - Part 2

Last year, I shared the Disney autograph album I made for my kids to share. This year, I think my 2.5 year old will enjoy having his own album, so my daughter will keep the original album, and I've made a similar one for my son.


I used the same sketch book to start and again covered it with a piece of scrapbook paper and added letter stickers to spell out Disney and my son's name. I also added some chunky gold glitter and gold confetti stars. I coated the whole thing with a few coats of Mod Podge for durability. And, again, I knotted some grosgrain ribbon around the spiral binding.


I also added some silver star confetti to Meg's album to fancy it up and some baker's twine to both albums to hold the chunky clickable Sharpies in place.


The album worked so well last time. The pages are nice and thick so the Sharpie doesn't bleed through, the cover folds around to the back so it's easier for the costumed characters to hold, and the book still looks brand new after the beating it took at the park. I went through and labeled every left-hand page in each book as a photo page, so the characters will know to only sign on the right-hand pages and I can attach photos of the interactions when we get home. I also wrote our phone number and email address inside the covers as well as penciled in our hotel name and dates so the books can be sent straight there if lost while we're still on vacation.


Photobucket

Wednesday, February 5, 2014

Disney Pressed Penny Machine Prep - Penny Tubes and Cleaning Pennies

We're working on a few projects this month for our upcoming Disneyland trip. Last year, my daughter (then 3) loved the pressed penny machines, and she still looks at and talks about those souvenirs frequently. She's really looking forward to making some more and has been saving her quarters and pennies (it costs $.50 per penny). We decided to shine the pennies up this time so they'd be even prettier when pressed. I read a tip online to use pre-1982 pennies, because the zinc in later coins can cause discolored streaks after pressing. I used these tips for cleaning the pennies.

We started by soaking the pennies for 5 minutes in a mixture of vinegar and salt. Make sure you don't do this with post-1982 pennies, or they'll turn black. After scrubbing with a toothbrush, rinsing, and drying them, they looked much cleaner, but I decided to test out the pencil eraser tip (method 5 from the link) as well, and I was amazed by the difference.


Check out the 1946 penny!


Rubbing them with the pencil eraser after the vinegar soak/scrub/dry took almost no effort, and the end result was so worth it! I decided to try the eraser on a penny I hadn't first cleaned with vinegar. It took a lot more rubbing, and the crevices didn't come as clean as the pre-cleaned pennies, but it still looked much better than it started.


Left: vinegar wash, then eraser. Right: no vinegar wash, just eraser.


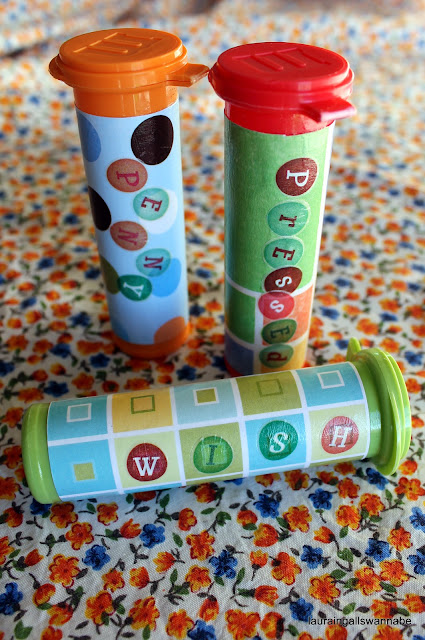
Once I finished cleaning the pennies, I stored them away in our penny tubes for the park. I made these from M&Ms Minis tubes wrapped with scrapbook paper, labeled with stickers (Meg did this part herself), and coated in Mod Podge for durability. I wish I could tell you where to find the Minis tubes in stores, but my kids received them as gifts last year from family, so I have no clue. Also, I can't take credit for this idea. It's all over blogs and Pinterest and Disney message boards.

The "penny" tube holds stacks of 2 quarters and a penny, for quick dispensing when we find a machine. The "pressed" tube holds the finished pressed pennies. The "wish" tube holds new shiny pennies for using in Snow White's wishing well.


Photobucket

Sunday, March 10, 2013

Homemade Personalized Disney Autograph Album

I wasn't crazy about the price tag or styles of Disney park autograph albums for our Disneyland trip, so I made one for Meg in advance. I had a surprisingly difficult time locating the perfect notebook to use as a base at first. I finally went with this one from Amazon. I wanted thick blank pages, spiral bound, 4x6ish, hard cover, no perforated pages, and an affordable price. This one hit all those marks except for the perforated pages, but they're nice and tight, so there's no real concern about them falling out, and it was a non-issue.


I mod podged some scrapbook paper to the front and some stickers spelling out "Disney" and my kids' nicknames. I covered it all with 3 heavy coats of mod podge to it'd stick well. Then I tied a variety of short ribbon pieces onto the spirals to fancy it up a bit more.


I purchased fat clickable Sharpies, so the characters in suits could easily operate them. It worked really well. Here it is in action:


Photobucket

Saturday, March 9, 2013

Disney-Inspired Monsters, Inc. Mike Wazowski Shirt

I needed one more Disney-themed shirt for James to wear on our Disneyland vacation, but I wasn't liking anything I saw in stores. The only thing that struck my fancy was a Monster's Inc. onesie from Target, but it only came in infant sizes. So I decided to make my own. Finding a lime green top in his size proved difficult, but I finally spotted one in Wal-Mart. It had some screen-printed saying on it, but it was easily covered up by the applique. And it was only $3.50!


I used felt for the applique, because that was the only fabric I had on hand in the right colors. I went to our recycling shelves and grabbed some plastic lids in a few sizes to use as circle templates. I made two of the white one so it'd be thick enough that none of the screen printing underneath would show through. Then just a smaller blue and an even smaller black circle all bound together with fusible interfacing and stitched to the shirt with coordinating thread. I didn't have to tightly zigzag the edges, because the felt won't fray, so I did a simple straight stitch the disappeared nicely.

And here it is in action:


We got so many compliments on his shirt in the park. This is definitely one he'll be wearing over and over again. I was worried the 4 layers of felt would be cumbersome, but that didn't prove to be the case at all.


Photobucket

Friday, March 8, 2013

Disney-Inspired Mickey Head Shirts

Another easy Disney project I undertook in preparation for our trip was to make simple coordinating shirts for the kids. I stole some plain black shirts from their closets, cut Mickey heads from fabric in my stash, and appliqued them on. Couldn't get any simpler, and they looked darling. I wanted to make sure that any clothing I made for the trip was something I'd put the kids in later. No need for one-time-use clothing. By using the simple shape and fashionable fabrics, I have no stylistic misgivings about my kids wearing these shirts again and again.


Here they are in action:


Photobucket

Thursday, March 7, 2013

Disney-Inspired Ribbon Sculpture Hair Clips - Jessie, Belle, and Mickey

We recently got back from a trip to Disneyland, so this blog is about to get Disney-heavy for a while. I went a little crazy crafting clothes and accessories for the kids, which just served to build our excitement and anticipation.

I don't have a tutorial or in-progress photos for this first one. I just Google image searched pictures of ribbon sculpture bows for the characters I wanted to use as inspiration and winged it from there. I matched the clips to the three outfits I'd planned for my daughter to wear on our trip. They really were so very simple and didn't take more than 10 minutes apiece to construct from grosgrain ribbon, alligator clips, tiny rhinestones, and hot glue.


Here they are in action:


Unfortunately, I didn't get any great photos of this one.


If you have any specific questions about the process, I'd be glad to try to help!


Photobucket