Saturday, January 7, 2012

Homemade Light Box and Play Materials

I follow a lot of play-based preschool blogs, and lately I've been seeing light table play popping up all over them. I looked into buying one, but the tables I found online were all in the $150-400 range. Not in the budget. So I made my own.

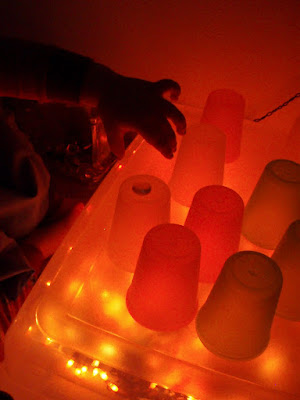
I used a plastic storage bin and Christmas lights (actually, Halloween lights - $0.50/box on sale after Halloween). The bin is long and shallow. The underside is flat, unmarked, and frosted. Perfect for diffusing light. The little ridge running around the edge keeps small objects from falling off. I got this bin from Wal-Mart for $6.


I also bought some mirror tiles that I think will be nice to hang above the light box in the playroom. I'm considering painting the sides/lid inside the box silver or lining them with something reflective, but it's functioning just fine as-is.

Again searching online for light box play materials, I was staggered by the prices. So I scoured my craft room for translucent/transparent materials. I came out with clear plastic shower curtain rings, clear flat-bottomed glass marbles, colored glass cubes, and colored tumbled glass. I also grabbed some extra colored translucent cups from the kitchen and found some vinyl containers from the dollar store.


Margaret went crazy when she awoke from her nap to this fun new toy. She spent the rest of the evening sorting, stacking, dumping, and creating patterns on the light box.

Sorting the glass by color.

Lining up the cubes.

She took a quick break to don her Emily (Little Bear) costume and went right back to work with the cups.


Photobucket

Friday, January 6, 2012

Independent Play with Creative Materials

The other day, I was having a busy morning, pulling all the cushions off the couches and vacuuming them. Miss Meg was having a busy morning of her own.

I found her hanging out in the family room. She'd carried down a few tubs of embellishments from her new art center in the kitchen. She laid out her blankie and got to work with colored Popsicle sticks, pom pom balls, and pony beads.


It's so fun to see the things she comes up with now that she has free access to these creative materials and plenty of independent time to explore them.

A little later, I came downstairs to find she'd placed the sticks on every flat surface in the room. One on each bookshelf, lining the back of the couch, atop the TV, etc. These simple materials kept her engaged for a good hour and a half.


Photobucket

Thursday, January 5, 2012

Toddler Lunches - Buffet Style

Margaret has officially reached that delightful "picky eater" stage of toddlerhood. It was only a matter of time, really. My kid went from gobbling tofu and sugar snap peas and plates of stir fry to taking an experimental lick of her peanut butter sandwich before turning her nose up at it and demanding one of the three foods she'll reliably consume: bananas, oatmeal, and milk.

I'm no short order cook. At dinner time, we serve what we've chosen, and her choice is whether she eats it or not. She usually chooses "not." When I'm feeling more enlightened, I remind myself that she's learning autonomy and wanting to take charge of her own eating choices. I don't blame her. I like to have a little choice in what I eat, too.

Enter the buffet. This Thanksgiving, my grandma laid out a lovely spread of fruits, veggies, crackers, and other finger foods to pick at while we waited for dinner. Margaret was in heaven. She got her own plate and loaded it up with anything that struck her fancy. She ate it all and then went back for seconds... and thirds!

I decided to give it a shot and replicate this idea for our lunches at home. (Dinners are still the same, in hopes she eventually decides to step outside her comfort zone.) I set out a selection similar to the Thanksgiving buffet (though not nearly so fancy or decadent) and gave Meg a divided dish to load up as she pleased.


I got these divided food storage containers from Wal-Mart. This way, I can prepare a week's worth of lunches and just pull the containers out every day at lunchtime.

I bought this fruit spread mostly because I wanted the tray! Once the precut fruit was gone, I've been cutting my own up and presenting it in the same tray.

Everything on the table was nutritious, so she was free to have as much or as little of anything she wanted. From what I've read, one should be more concerned with a toddler's diet being balanced over the course of a week, rather than a day. So 3 days of veggies followed by a lunch of only cheese isn't a problem. Every day, I'd set out the same offerings, and she'd help herself. Once something was gone it was gone, so if she chose to eat all the grapes in one day, she'd have to switch to apples or melon to satiate her sweet tooth later in the week.

I refill the trays once everything's been eaten. I shoot for at least two:
fruits: anything seasonal and cheap
vegetables: ditto
grains: crackers, pretzels, tortilla chips, bread
protein: cheese, deli meat, chunks of chicken, beans, nuts

Sometimes I'll add a yogurt dip or hummus.

Here's the plate she made for herself the first day:

Pretty cute, huh? She sure was crazy about those grapes. I was pleased to see her also go for some whole wheat crackers and cauliflower too. We're about a month into the buffet experiment, and it's still going strong. As soon as she wakes up from her morning nap, she begs for her fun lunch.

I've got to admit, I'm quite enjoying the experience myself. I've mentioned before that I really loathe cooking. This requires very little food prep, and it still gives my kid (and me) a healthy, tasty lunch. It's awesome that it takes me almost no effort to be so virtuous. Heck, it's easier than cooking up a package of ramen noodles!


Photobucket

Saturday, December 31, 2011

Banging Wall

I just realized I never shared the gift we made for Margaret's birthday, a banging wall. It's the first of what we hope will be many playful installations in our backyard over the next few years.


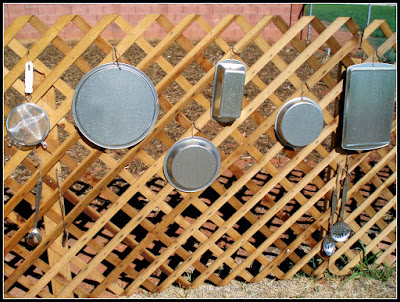
I got all the pieces from the dollar store. We drilled holes in the pans and hung them with knotted twine from a lattice fence that runs through the center of our yard. We added hooks to hang large spoons and stirrers used to bang on the pans.

Margaret really loves going outside and making a racket with her banging wall. I've got my eye out for more interesting pieces to add to it over time. I've salvaged some pieces of an old metal xylophone that might be fun.


Photobucket

Friday, December 30, 2011

Toddler Art and Sensory Material Storage

For our updated storage, click here.

With all the new art and sensory box supplies Meg got for Christmas, I decided it was time to update her storage situation. I'd been shoving all her art supplies into pigeon holes above a desk in our kitchen and keeping extras in a desk in my craft room. This meant she had to ask for help accessing her supplies, and the storage areas were overflowing.

So, I took out her (mostly unused anyway) highchair and did this:

The table is a Lack side table from Ikea. Just $6, and it's the perfect height for her.

I didn't have a large budget, but I wanted everything visible, easy for Margaret to access herself, and somewhat matching and attractive, since it would be seen from the front door.

I started with a $15 bookshelf from Wal-Mart. We have 8 of these scattered about our house in various sizes. They're inexpensive, unobtrusive, and really functional.


I bought 2 quart plastic jars ($2 apiece) and 4-packs of food storage containers ($2/pack) for the art supplies and sensory materials.

Top shelf: crayons, markers, pipe cleaners, and various blank papers in a magazine holder.
Second shelf: shaving cream, water beads, grey moon sand, blue moon sand, pinto beans.

Third shelf: paintbrushes, glue, masking tape, empty containers for painting, collage material and play dough.
Bottom shelf: outdoor play clothes.

It was important to me that the containers be clear, because I find it easier to be creative when I can see all my materials at a glance, rather than reading labels or remembering what containers hold. I figured the same would be true for Margaret. I wish I didn't have to stack them all two-deep, but our space is finite, so you do what you gotta do. Hopefully, some rotation on my part will keep things fresh.

On the bottom shelf of the bookcase, I put a dishwashing bin ($2) and a CD organizing crate ($1). They hold outdoor messy play clothes, so we don't always have to trek upstairs before we head outside to play. I tucked a pair of old shoes for myself on the shelf and we hang our "messy jackets" on pegs beside the bookcase.


I'm really happy with this new storage arrangement. There's room for both the materials and my girl to grow and change, she can access everything herself, and it looks neat and orderly. Do we call that a win-win-win?


Photobucket